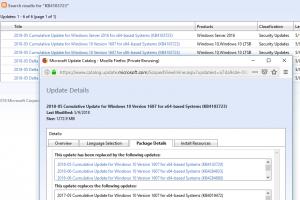
Следующим шагом является повышение безопасности нового ключа. В консоли API нажимаем кнопку «Учетные данные» и переходим в консоли непосредственно на ссылку «ключ API».
Открывается новый экран, где можно ограничить использование API только одним веб-сайтом. Это означает, что ни один неавторизованный пользователь не сможет достать твой ключ API, а затем использовать его на другом веб-сайте, и таким образом расходовать дневную норму ключа по загрузке карты. Что, возможно, будет стоить денег, если включен биллинг.
Ограничить использование ключа просто. В открывшемся окне найди раздел «Ограничение для ключа».

Если нужно отображать карты на твоем сайте — выбери вариант «HTTP источники перехода (веб-сайты)».
Это откроет новое поле, чтобы добавить туда свой домен или домены. Не забудь добавить их в требуемом формате:
*.example.com/*
где «example.com» — имя сайта.
В качестве подстановочного знака используй звездочку. Если ты оставишь это поле пустым, запросы будут приниматься от всех источников. Звездочки, косые и точки должны быть отформатированы так же, как в шаблоне.
Если нужно добавить несколько доменов — нужно добавить их по одному в каждую новую строку.
Последнее обновление:14/01/15
Что это за плагин Akismet и как получить API ключ Akismet бесплатно
Сейчас я расскажу, что это за плагин Akismet и как получить API ключ Akismet бесплатно, и одновременно установлю его на свой блог.
Для защиты сайта от спама, пожалуй, чаще всего используется плагин Akismet. Это объясняется тем, что его не надо устанавливать: он устанавливается на сайт вместе с . Остается только активировать и… пользуйтесь на здоровье!
Правда, тут есть одна сложность. После его активации Вы получаете вот такое сообщение:
«Akismet почти включён. Чтобы работать с ним, нужно ввести API ключ Akismet.»
Для начинающих блоггеров эти слова, что китайская грамота. Я помню, сама долго даже не пыталась получить этот ключ, так как не понимала, что такое API. Но став немного поопытнее и посмелее, я нажала на эту ссылку (если Вы обратили внимание, слова «ввести API ключ Akismet» являются ссылкой) и оказалось, что все очень просто, и даже не надо знать про эти API:).
Итак, нажимаем на эту ссылку, на следующей странице нас просят ввести ключ или получить его. Нажимаем одновременно клавишу Ctrl и ссылку «Получить ключ» (чтобы открыть новую страницу в новой вкладке), и попадаем на сайт плагина. Там все на английском языке, но мы разберемся без переводчика.
Кликаем по кнопке «Get an Akismet API key» → нас просят зарегистрироваться. Надо ввести электронную почту, придумать логин и пароль. На следующей странице выбираем вид аккаунта → Personal. Затем нас спрашивают, сколько мы будем платить. Так как платить я не собираюсь, то бегунок на шкале левее улыбающейся рожицы я двигаю к нулю. Обратите внимание, как меняется выражение рожицы:).
В форме слева пишем свои (или вымышленные) имя и фамилию и жмем Continue. Через некоторое время открывается страница с API ключом. Копируем этот ключ и возвращаемся на свой блог, на ту страницу, с которой уходили на сайт плагина. Вставляем ключ в рамку, ставим ниже обе галки и жмем на Обновить настройки. Вот и все, Akismet сразу же начинает работать.
Сегодня мы узнали, что это за плагин Akismet и как получить API ключ Akismet бесплатно.
А в конце, как Вы уже догадались, видеоролик:
API-key передаются в следующей форме:
key ID
и Ver.code
API-key для получения расширенных прав в нашей корпорациии нужно отсылать внутриигровой почтой на Mrs First Teacher
Для получения расширенных прав в нашей корпорации нужны все отмеченные пункты.
Обратите внимание на стрелочку возле пункта "персонажи". Там должно стоять слово "All". Это тоже очень важно. Даже если у вас на аккаунте всего один персонаж.
Также должна стоять галка в пункте про срок действия ключа.
В случае, если Вы уйдете из нашей корпорации, этот ключ всегда можно удалить и создать новый.
Что такое API-ключи
API-key - это специально создаваемая совокупность номера и проверочного кода.
(Он не связан ни с логином, ни с паролем аккаунта. Он связан с персонажами и создаётся внутри аккаунта.)
Он создан разработчиками специально для read-only доступа к информации о персонажах.
API-ключи дают возможность сторонним программам только видеть данные о персонаже, его корпорации и т.п. Изменять параметры в игре они не могут.
Вся информация даётся только в режиме чтения, ничего изменить, обладая любым видом API-ключа, нельзя!
Если же нужен отличный от наших требований ключ, то получить его можно на сайте игры, по адресу https://community.eveonline.com/support/api-key/
Набрав этот адрес, вы попадёте на страницу логина.
Введя свой логин и пароль, вы увидите страницу генерации ключей.
Вы можете выбирать, какую информацию предоставлять по ключу.
Вообще, можно создавать самые разные ключи, не удаляя старых.
Ключи можно создавать, можно редактировать, можно удалять.
Инструкция в картинках:
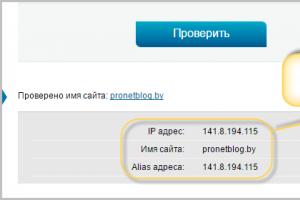
У игры есть сайт поддержки, его адрес http://support.eveonline.com
Если одолели подозрения, всегда можно поглядеть в адресную строку. С этого сайта можно пройти в раздел создания и редактирования API-ключей.
Попадаем на страницу ввода логина/пароля. Заходим. Вот она, страница создания и редактирования ключей.
Так выглядит страница создания отдельного ключа. Обратите внимание на выделенные фрагменты.
Кнопочка "submit" внизу тоже не просто так нарисована, она сохраняет ключ. Теперь, когда ключ сохранён и готов, ещё раз удостоверяемся, что он соответствует нашим запросам, и копируем его прямо из браузера в почту или в чат, куда нужно.
Нажав на кнопку "Submit" внизу этой странички, вы сохраняете ключ и попадаете обратно на страницу api-ключей:
Вот что отвечают на вопрос "что такое API key?" сами CCP:
API key - это ключ для доступа к информации о персонаже, без использования которого написанные игроками программы (такие, как EVEMon) не смогут эту информацию получить. Ключей у каждой учётной записи может быть несколько (список ключей доступен ), но изначально их нет вообще; они создаются на этой странице , причём для каждого ключа определяется, что именно он «открывает» - можно, например, ограничиться информацией о внутриигровых переводах денег (WalletJournal) и имуществе, которым владеет персонаж (AssetList), а можно открыть абсолютно все, включая внутриигровую почту (MailMessages + MailBodies). Ключи в любой момент можно уничтожить, полностью обрезав доступ сторонним программам. Никакой действительно важной информации (логин, пароль, имя-фамилия владельца учётки, данные о кредитных карточках и т. д.) игра наружу не отдаёт; изменить что-либо в игре при помощи EVE API вам (или кому-либо ещё) не удастся.
Требование предоставить в распоряжение корпорации ключ - совершенно обычное дело. Сделайте ключ с теми настройками, которые указаны в правилах приёма (или на форуме корпорации) и передайте его вашим товарищам; выдача ключа корпорации - это и знак доверия, и вклад в дело обеспечения внутренней безопасности («Миша, почему у тебя в личном ангаре стоит корабль, который Петя вчера оставил на ПОСе? Миша, почему корпорация, с которой мы воюем, перевела тебе 100кк? Миша, зачем ты качаешь Defender Missiles в 5?»).
Следующим шагом является повышение безопасности нового ключа. В консоли API нажимаем кнопку «Учетные данные» и переходим в консоли непосредственно на ссылку «ключ API».
Открывается новый экран, где можно ограничить использование API только одним веб-сайтом. Это означает, что ни один неавторизованный пользователь не сможет достать твой ключ API, а затем использовать его на другом веб-сайте, и таким образом расходовать дневную норму ключа по загрузке карты. Что, возможно, будет стоить денег, если включен биллинг.
Ограничить использование ключа просто. В открывшемся окне найди раздел «Ограничение для ключа».
Если нужно отображать карты на твоем сайте — выбери вариант «HTTP источники перехода (веб-сайты)».
Это откроет новое поле, чтобы добавить туда свой домен или домены. Не забудь добавить их в требуемом формате:
*.example.com/*
где «example.com» — имя сайта.
В качестве подстановочного знака используй звездочку. Если ты оставишь это поле пустым, запросы будут приниматься от всех источников. Звездочки, косые и точки должны быть отформатированы так же, как в шаблоне.
Если нужно добавить несколько доменов — нужно добавить их по одному в каждую новую строку.
To use the Geocoding API, you must get an API key which you can then add to your mobile app, website, or web server. The API key is used to track API requests associated with your project for usage and billing. To learn more about API keys, see the and the .
Reminder: To use the Geocoding API, you must get an API key and you must enable billing. You can enable billing when you get your API key (see the ) or as a separate process (see ). Note: Before moving your mobile app, website, or web server to production, it is recommended that you secure your API key by adding a restriction (see ).Console
Quick guide
Step 1: Get an API key
Click the button below, to get an API key using the . You will be asked to (1) pick one or more products, (2) select or create a project, and (3) set up a billing account. Once your API key is created you will be prompted to restrict the key"s usage. (For more information, see .)
Get StartedStep 2: Add the API key to your request
When loading the Geocoding API, substitute YOUR_API_KEY in the code below with the API key you got from the previous step.
Https://maps.googleapis.com/maps/api/geocode/json?address=1600+Amphitheatre+Parkway,+Mountain+View,+CA&key= YOUR_API_KEY
Detailed guide
Detailed guide for Premium Plan customers
To use the Geocoding API, you must authenticate requests using either an API key
or
Choosing an authentication method for your application
The authentication method you choose is based on your license:
- Customers with the can use an API key or a client ID and digital signature.
- Customers with a must use a client ID and digital signature.
Have the Premium Plan or a previous license?
To determine which license you have:
> In the Google Cloud Support Portal ,
click Maps: Usage Report
on the left.
> Does the ID at the top of the report have the following format?
gme-[company
] & proj-[number
] ([type
])
If yes, you have the .
If no, you have a
(Maps APIs for Work or Maps API for Business).
When deciding which authentication method to use, consider the following:
- Authentication using an API key
(Premium Plan license)
By using an API key to authenticate your applications, you can:- Manage all of your APIs in the Google Cloud Platform Console .
- Access real-time usage data and 30 days of historical usage data for your application in the Google Cloud Platform Console .
- Google Cloud Support Portal .
- Authentication using a client ID and digital signature
(Premium Plan or previous license)
By using your client ID and digital signature to authenticate your application, you can:- Add the channel parameter to requests so you can view more detailed usage reports.
- View usage reports with more than 30 days of data in the Google Cloud Support Portal .
- Use Maps Analytics tools for the Maps JavaScript API.
Authenticating your application using an API key
Note: For customers with the Premium Plan license.Follow these steps to get an API key and add restrictions:
Authenticating your application using a client ID and digital signature
Note: For customers with the Premium Plan or previous license. #!/usr/bin/python # -*- coding: utf-8 -*- """ Signs a URL using a URL signing secret """ import hashlib import hmac import base64 import urlparse def sign_url(input_url=None, secret=None): """ Sign a request URL with a URL signing secret. Usage: from urlsigner import sign_url signed_url = sign_url(input_url=my_url, secret=SECRET) Args: input_url - The URL to sign secret - Your URL signing secret Returns: The signed request URL """ if not input_url or not secret: raise Exception("Both input_url and secret are required") url = urlparse.urlparse(input_url) # We only need to sign the path+query part of the string url_to_sign = url.path + "?" + url.query # Decode the private key into its binary format # We need to decode the URL-encoded private key decoded_key = base64.urlsafe_b64decode(secret) # Create a signature using the private key and the URL-encoded # string using HMAC SHA1. This signature will be binary. signature = hmac.new(decoded_key, url_to_sign, hashlib.sha1) # Encode the binary signature into base64 for use within a URL encoded_signature = base64.urlsafe_b64encode(signature.digest()) original_url = url.scheme + "://" + url.netloc + url.path + "?" + url.query # Return signed URL return original_url + "&signature=" + encoded_signature if __name__ == "__main__": input_url = raw_input("URL to Sign: ") secret = raw_input("URL signing secret: ") print "Signed URL: " + sign_url(input_url, secret)Java
The example below uses the java.util.Base64 class available since JDK 1.8 - older versions may need to use Apache Commons or similar. (Download the code.)
Import java.io.IOException; import java.io.UnsupportedEncodingException; import java.net.URI; import java.net.URISyntaxException; import java.security.InvalidKeyException; import java.security.NoSuchAlgorithmException; import java.util.Base64; // JDK 1.8 only - older versions may need to use Apache Commons or similar. import javax.crypto.Mac; import javax.crypto.spec.SecretKeySpec; import java.net.URL; import java.io.BufferedReader; import java.io.InputStreamReader; public class UrlSigner { // Note: Generally, you should store your private key someplace safe // and read them into your code private static String keyString = "YOUR_PRIVATE_KEY"; // The URL shown in these examples is a static URL which should already // be URL-encoded. In practice, you will likely have code // which assembles your URL from user or web service input // and plugs those values into its parameters. private static String urlString = "YOUR_URL_TO_SIGN"; // This variable stores the binary key, which is computed from the string (Base64) key private static byte key; public static void main(String args) throws IOException, InvalidKeyException, NoSuchAlgorithmException, URISyntaxException { BufferedReader input = new BufferedReader(new InputStreamReader(System.in)); String inputUrl, inputKey = null; // For testing purposes, allow user input for the URL. // If no input is entered, use the static URL defined above. System.out.println("Enter the URL (must be URL-encoded) to sign: "); inputUrl = input.readLine(); if (inputUrl.equals("")) { inputUrl = urlString; } // Convert the string to a URL so we can parse it URL url = new URL(inputUrl); // For testing purposes, allow user input for the private key. // If no input is entered, use the static key defined above. System.out.println("Enter the Private key to sign the URL: "); inputKey = input.readLine(); if (inputKey.equals("")) { inputKey = keyString; } UrlSigner signer = new UrlSigner(inputKey); String request = signer.signRequest(url.getPath(),url.getQuery()); System.out.println("Signed URL:" + url.getProtocol() + "://" + url.getHost() + request); } public UrlSigner(String keyString) throws IOException { // Convert the key from "web safe" base 64 to binary keyString = keyString.replace("-", "+"); keyString = keyString.replace("_", "/"); System.out.println("Key: " + keyString); // Base64 is JDK 1.8 only - older versions may need to use Apache Commons or similar. this.key = Base64.getDecoder().decode(keyString); } public String signRequest(String path, String query) throws NoSuchAlgorithmException, InvalidKeyException, UnsupportedEncodingException, URISyntaxException { // Retrieve the proper URL components to sign String resource = path + "?" + query; // Get an HMAC-SHA1 signing key from the raw key bytes SecretKeySpec sha1Key = new SecretKeySpec(key, "HmacSHA1"); // Get an HMAC-SHA1 Mac instance and initialize it with the HMAC-SHA1 key Mac mac = Mac.getInstance("HmacSHA1"); mac.init(sha1Key); // compute the binary signature for the request byte sigBytes = mac.doFinal(resource.getBytes()); // base 64 encode the binary signature // Base64 is JDK 1.8 only - older versions may need to use Apache Commons or similar. String signature = Base64.getEncoder().encodeToString(sigBytes); // convert the signature to "web safe" base 64 signature = signature.replace("+", "-"); signature = signature.replace("/", "_"); return resource + "&signature=" + signature; } }
Node JS
The example below uses native Node modules to sign a URL. (Download the code.)
"use strict" const crypto = require("crypto"); const url = require("url"); /** * Convert from "web safe" base64 to true base64. * * @param {string} safeEncodedString The code you want to translate * from a web safe form. * @return {string} */ function removeWebSafe(safeEncodedString) { return safeEncodedString.replace(/-/g, "+").replace(/_/g, "/"); } /** * Convert from true base64 to "web safe" base64 * * @param {string} encodedString The code you want to translate to a * web safe form. * @return {string} */ function makeWebSafe(encodedString) { return encodedString.replace(/\+/g, "-").replace(/\//g, "_"); } /** * Takes a base64 code and decodes it. * * @param {string} code The encoded data. * @return {string} */ function decodeBase64Hash(code) { // "new Buffer(...)" is deprecated. Use Buffer.from if it exists. return Buffer.from ? Buffer.from(code, "base64") : new Buffer(code, "base64"); } /** * Takes a key and signs the data with it. * * @param {string} key Your unique secret key. * @param {string} data The url to sign. * @return {string} */ function encodeBase64Hash(key, data) { return crypto.createHmac("sha1", key).update(data).digest("base64"); } /** * Sign a URL using a secret key. * * @param {string} path The url you want to sign. * @param {string} secret Your unique secret key. * @return {string} */ function sign(path, secret) { const uri = url.parse(path); const safeSecret = decodeBase64Hash(removeWebSafe(secret)); const hashedSignature = makeWebSafe(encodeBase64Hash(safeSecret, uri.path)); return url.format(uri) + "&signature=" + hashedSignature; }
C#
The example below uses the default System.Security.Cryptography library to sign a URL request. Note that we need to convert the default Base64 encoding to implement a URL-safe version. (Download the code.)
Using System; using System.Collections.Generic; using System.Security.Cryptography; using System.Text; using System.Text.RegularExpressions; using System.Web; namespace SignUrl { public struct GoogleSignedUrl { public static string Sign(string url, string keyString) { ASCIIEncoding encoding = new ASCIIEncoding(); // converting key to bytes will throw an exception, need to replace "-" and "_" characters first. string usablePrivateKey = keyString.Replace("-", "+").Replace("_", "/"); byte privateKeyBytes = Convert.FromBase64String(usablePrivateKey); Uri uri = new Uri(url); byte encodedPathAndQueryBytes = encoding.GetBytes(uri.LocalPath + uri.Query); // compute the hash HMACSHA1 algorithm = new HMACSHA1(privateKeyBytes); byte hash = algorithm.ComputeHash(encodedPathAndQueryBytes); // convert the bytes to string and make url-safe by replacing "+" and "/" characters string signature = Convert.ToBase64String(hash).Replace("+", "-").Replace("/", "_"); // Add the signature to the existing URI. return uri.Scheme+"://"+uri.Host+uri.LocalPath + uri.Query +"&signature=" + signature; } } class Program { static void Main() { // Note: Generally, you should store your private key someplace safe // and read them into your code const string keyString = "YOUR_PRIVATE_KEY"; // The URL shown in these examples is a static URL which should already // be URL-encoded. In practice, you will likely have code // which assembles your URL from user or web service input // and plugs those values into its parameters. const string urlString = "YOUR_URL_TO_SIGN"; string inputUrl = null; string inputKey = null; Console.WriteLine("Enter the URL (must be URL-encoded) to sign: "); inputUrl = Console.ReadLine(); if (inputUrl.Length == 0) { inputUrl = urlString; } Console.WriteLine("Enter the Private key to sign the URL: "); inputKey = Console.ReadLine(); if (inputKey.Length == 0) { inputKey = keyString; } Console.WriteLine(GoogleSignedUrl.Sign(inputUrl,inputKey)); } } }
For testing purposes, you can test the following URL and private key to see if it generates the correct signature. Note that this private key is purely for testing purposes and will not be validated by any Google services.
- URL : https://maps.googleapis.com/maps/api/geocode/json?address=New+York&client= clientID
- Private Key : vNIXE0xscrmjlyV-12Nj_BvUPaw=
- URL Portion to Sign : /maps/api/geocode/json?address=New+York&client= clientID
- Signature : chaRF2hTJKOScPr-RQCEhZbSzIE=
- Full Signed URL : https://maps.googleapis.com/maps/api/geocode/json?address=New+York&client= clientID &signature=chaRF2hTJKOScPr-RQCEhZbSzIE=
Examples in additional languages
Examples that cover more languages are available in the url-signing project.
More about your private cryptographic key
Your private cryptographic URL-signing key will be issued with your client ID and is a "secret shared key" between you and Google. This signing key is yours alone and is unique to your client ID. For that reason, please keep your signing key secure. This key should not be passed within any requests, stored on any websites, or posted to any public forum. Anyone obtaining this signing key could spoof requests using your identity.
Note: This private cryptographic signing key is not the same as the API keys issued by the Google Cloud Platform Console.
If you"ve lost your private cryptographic key, log in to the Google Cloud Support Portal and click Maps: Manage Client ID to retrieve it.
Restricting an API key
Google Maps APIs are available via HTTP web services, for web browsers, and Android or iOS apps. APIs in any platform can use an unrestricted API key. You can optionally add a restriction (for example, IP addresses) to the API key. Once restricted, a key will only work on platforms that support that type of restriction.
Note: Before moving your app or website to production, it is recommended that you secure your API key by adding a restriction. To learn more, see the and Securing an API key .To add restrictions to an API key, do the following:
Troubleshooting authentication issues
If your request is malformed or supplies an invalid signature, the Geocoding API returns an HTTP 403 (Forbidden) error.
To troubleshoot individual URLs, you can use the URL Signing Debugger . It allows you to quickly validate a URL and signature generated by your application.
Alternatively, Google Maps APIs Premium Plan customers can troubleshoot individual URLs by logging in to the Google Cloud Support Portal and selecting Resources > Google Maps APIs Premium Plan online tools > URL Signing Debugger for Web Service and Image APIs .
Except as otherwise noted, the content of this page is licensed under the Creative Commons Attribution 3.0 License , and code samples are licensed under the Apache 2.0 License . For details, see our . Java is a registered trademark of Oracle and/or its affiliates.
Обновлено Март 11, 2019